
Boilerplate Code
Stateful widgets are great and all, but they come with a lot of boilerplate code when dealing with controllers like TextEditingControllers, AnimationControllers, ScrollControllers, and more.
To showcase this, let’s build a basic form in Flutter using a StatefulWidget. We want our TextFormField to have an initial value, so that means we need to remember to first instantiate a TextEditingController and then dispose of the TextEditingController to avoid memory leaks.
// main.dart

class BasicForm extends StatefulWidget {
  @override
  _BasicFormState createState() => _BasicFormState();
}

class _BasicFormState extends State<BasicForm> {
  late TextEditingController _textController;

  @override
  void initState() {
    super.initState();
    _textController = TextEditingController(text: 'some text');
  }

  @override
  void dispose() {
    _textController.dispose();
    super.dispose();
  }

  @override
  Widget build(BuildContext context) {
    // ...
  }
}
To check if the form is valid, you have to instantiate a global key for the form and assign it as the form key. Then we’re able to validate the form by accessing the form key’s currentState and calling validate. Let’s toss in a state variable called _content, and display it above our TextFormField, making sure it changes whenever the TextFormField’s onChanged fires.
// main.dart

class BasicForm extends StatefulWidget {
  @override
  _BasicFormState createState() => _BasicFormState();
}

class _BasicFormState extends State<BasicForm> {
  final GlobalKey<FormState> _formKey = GlobalKey<FormState>();

  // ...

  @override
  Widget build(BuildContext context) {
    return Padding(
      padding: const EdgeInsets.all(24),
      child: Form(
        key: _formKey,
        child: Column(
          mainAxisAlignment: MainAxisAlignment.center,
          children: [
            Text(_content, style: const TextStyle(fontSize:20)),
            const SizedBox(height: 16),
            TextFormField(
              controller: _textController,
              onChanged: (val) => setState(() => _content = val),
              validator: (val) => val!.isEmpty ? 'Missing text' : null,
            ),
            TextButton(
              onPressed: () => _formKey.currentState!.validate(),
              child: const Text('Validate'),
            ),
          ],
        ),
      ),
    );
  }
}
This doesn’t look too bad, but remember we only have one TextEditingController. Imagine this form had three, five or even ten fields. We’d have to remember to instantiate and dispose of every single controller individually.
Form with Flutter Hooks
However, thanks to the flutter_hooks, we can reduce this boilerplate down to one line.
# pubspec.yaml

dependencies:
  flutter_hooks: ^0.18.5+1 # or <latest_version>
Let’s make a new widget called HooksForm that extends a HookWidget.
First, we create our formKey using useMemoized, a hook that caches the instance of our key for future use.
Next, we make our textController using useTextEditingController. It handles the instantiation and disposal of the TextEditingController automatically, which means we get to worry about one less thing while building our awesome apps.
Finally, we’ll add a useState hook to store our content string.
Let’s paste our previous code from the old form and fix the names of our variables accordingly. And now our form is working perfectly with less code.
// main.dart

class HooksForm extends HookWidget {
  const HooksForm({super.key});

  @override
  Widget build(BuildContext context) {
    final formKey = useMemoized(GlobalKey<FormState>.new);
    final textController = useTextEditingController(text: 'some text');
    final context = useState<String>('some text');
    return Padding(
      padding: const EdgeInsets.all(24),
      child: Form(
        key: formKey,
        child: Column(
          mainAxisAlignment: MainAxisAlignment.center,
          children: [
            Text(content.value, style: const TextStyle(fontSize:20)),
            const SizedBox(height: 16),
            TextFormField(
              controller: textController,
              onChanged: (val) => content.value = val),
              validator: (val) => val!.isEmpty ? 'Missing text' : null,
            ),
            TextButton(
              onPressed: () => formKey.currentState!.validate(),
              child: const Text('Validate'),
            ),
          ],
        ),
      ),
    );
  }
}
useEffect
So now you’re probably thinking this is cool and all, but you want to run code as soon as the widget is inserted into the widget tree like how initState does. Luckily, there’s a hook for that.
// main.dart

@override
void build(BuildContext context) {
  useEffect(() {
    print('useEffect callback');
    return null;
  });

  // ...
}
In the build method, we can add useEffect and add an effect callback. This callback is called synchronously on every build, which means if we don’t add any keys, it will always fire when the widget rebuilds.
// main.dart

@override
void build(BuildContext context) {
  // ...

  final content = useState<String>('some text');

  useEffect(
    () {
      print('useEffect callback');
      return null;
    },
    [content.value], // <---
  );

  // ...
}
If we want it to act like initState, then specify an empty list for the keys.
// main.dart
@override
void build(BuildContext context) {
// ...
useEffect(
() {
print('useEffect callback');
return null;
},
[], // <---
);
// ...
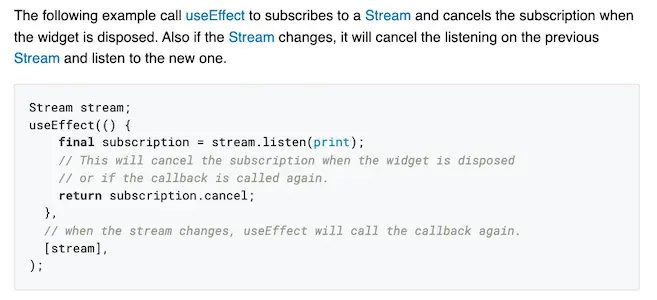
}And if we want the callback to fire only when specific values change, then we can add them to the list. This can be useful in cases where you’re dealing with subscribing to and canceling a subscription to a stream.
Wrap Up
There are a lot of reusable hooks that are included in the flutter_hooks package, and you can find out more info on the package page.
You can even write your own hooks for custom functionality and easy code reuse throughout your projects.